Greetings, Hypertransitory readers.
The magical day has finally come. Here at The Hypertransitory Towers (far above the plight and concerns of normal, common folk), I’ve decided to unleash some of the vast store of Photoshop how to knowledge I’ve gathered over the years.
In my travels I meet many people who would like to know how to achieve my Godlike proficiency in Photoshop. They feed me grapes, fan me with giant feathers and they try to copulate with me. Oh yeah, and then there’s the women…
Anyway, it’s a massive undertaking, fraught with peril. This game isn’t for everyone, people. I know I make it look easy, but it’s hard work -and well, somebody’s gotta do it…
So, I’m an Adobe Certified Expert in Photoshop CS. I mainly use CS4 now on a daily basis, although I never did take the tests for the later versions. My first unofficial tip will be not to take the Adobe ACE exams unless there truly is some financial benefit to doing so, meaning you’re a consultant or you may receive a raise with more credentials to your name.
Otherwise, save the $150 (U.S. -the cost when I took the test) unless you have the spare cash and just want the bragging rights.
So what about these tips? These are written using the shortcuts from the Mac version of Photoshop CS4. CS5 and near relatives should be similar, if not identical. If you have any questions, feel free to hit me up.
I also made a video for this one:
http://vimeo.com/21004185
It’s a long one, at about 43 minutes, so make sure you have some time…
Ok everybody, on with the tips! Photoshop tutorial class is NOW IN SESSION.
1. Keyboard shortcuts
A. Learn Those Keyboard Shortcuts
Back to Top
This is a real time-saver that will make you much more efficient. Moving your cursor up to the menus over and over again and searching through all the pulldowns wastes valuable seconds that you could be using to complete your task. Also it contributes to the onset of my mortal enemy –carpal tunnel syndrome.
Ok maybe it isn’t a mortal enemy, but it is a damned annoying one…
Anyway, when you find yourself constantly using the same menu commands, take note of the keyboard shortcut listed on the right of its name. Then force yourself to get in the habit of using the shortcut instead of the menu.
Pretty soon you won’t even be looking at the keyboard when you choose your tools or apply menu commands.
You’ll save an incredible amount of time. Whenever I’m training or just helping someone and I see that cursor traveling all the way across the screen over and over it’s painful. There’s a better way, people. Learn those keyboard shortcuts and live them.
B. Customize Keyboard Shortcuts
Back to Top
Some of the aforementioned keyboard shortcuts can be pretty long. Take for instance The “File>Save for Web & Devices” command under the File menu. The default keyboard shortcut for this is "Option-Shift-Command-S" ("Alt-Shift-Control-S" on a PC).
Man that’s a handful. I always change that to the [F4] key, so when it’s time to Save for Web, it’s just a quick stab to the [F4] key and it’s on, instead of contorting my fingers with the default setting.
Another one is the “Image>Image Size…” command. I use that a lot, so the default shortcut of Command-Option-I (Control-Option-I PC) was just no good. I changed it to [F1] and never looked back.
You can customize the keyboard shortcuts by using the “Edit >Keyboard Shortcuts…” command under the menu (get this: the keyboard shortcut for “Keyboard Shortcuts…” is atrocious – Command-Option-Shift-K. Wow, luckily it’s not one you’ll use on a daily basis).
You can change the shortcuts for Menus, Palettes and Tools here. A really cool part is if you assign a shortcut used by something else it gives you the opportunity to just jump right to the conflicting command and change it right away.
You can’t save over the default setting so it will make you create a new set. Just name it as you will and that’s that.
2. Customize Menus
Back to Top
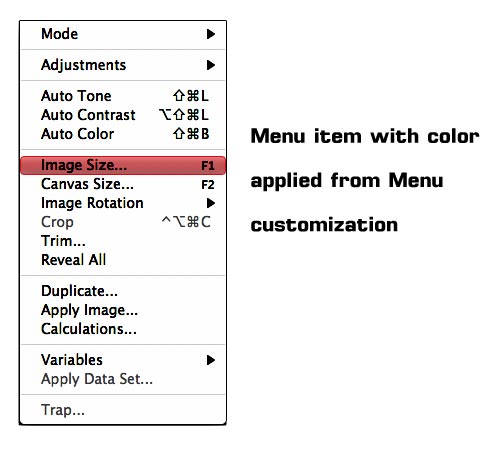
If you prefer to use the menus, you can still customize them to make them a bit more friendly. In the Edit menu, directly under the ‘Keyboard Shortcuts’ command is the ‘Menus…’ command.
Choosing this will bring you to a screen where you can color code menu entries to stand out more, and also turn off menu entries that you feel you never use. This can save you a second or two of scrolling through long lists of menu commands that you never use anyway.
3. Tab key for palettes
Back to Top
Sometimes having a bunch of palettes open really uses up your screen real estate if you have a small monitor, or only one.
At my job I had two large widescreen monitors, so one screen was filled up solely with palettes. At home however, I have a smaller screen, and only one of them to boot, so it’s imperative that I manage my palettes wisely.
But even when they’re organized, they’re still blocking some of my view. When I really need to see, I just press the [Tab] key, which hides all the palettes. I then have an unobstructed view of my image. Once I’m done editing or I need another palette, I just press [Tab] again, and back they all come.
Along with this, you can press the [F] key to cycle through full-screen views of your image. Pressing once will show it full-screen (but at your current magnification) on gray, and pressing it again will show it on black. Press [F] one more time to get back to your original view.
Doing this along with pressing [Tab] to get rid of the palettes, and also pressing Command-R to remove the rulers will give you an unobstructed view of your file.
4. Modifier keys
Back to Top
The modifier keys are keys such as [Shift], [Control], [Alt/Option]. These keys help you by allowing you to modify your currently chosen tool’s behavior without returning to the menus or tool palettes.
Let say I want to select something using the Lasso tool. I would type the [L] key, and it would be selected for me. Then I would draw an outline around something.
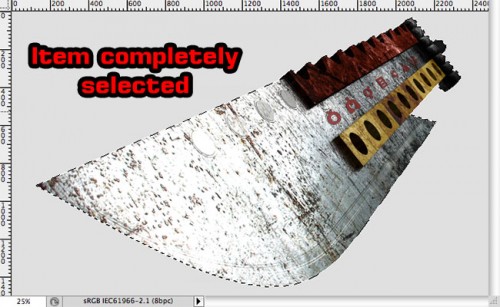
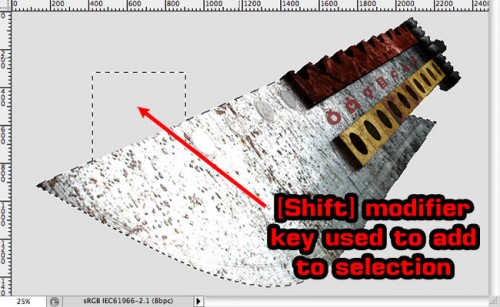
I might notice that I forgot to select part of the image. What I need to do now is press the [Shift] key. When I do this, I’ll see a small “plus” sign appear next to the tool. This is indicating to me that whatever I select next will be ADDED to the current selection.
If I needed to remove part of the selection, I would press the [Alt/Option] key, which would result in a “minus” sign appearing next to the tool. This would indicate that whatever I selected with this tool would be SUBTRACTED from the current selection.
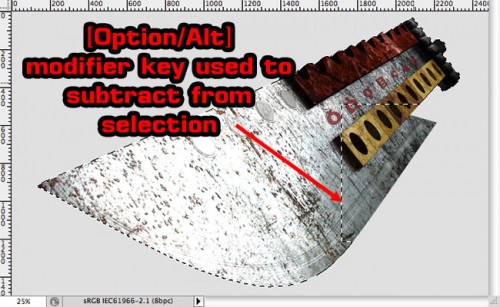
Usually, [Shift] will add and [Alt/Option] will subtract. In Photoshop, you can be sure that the modifier keys will always have some function depending on the context of the tool you have selected.
I make it my business to cycle through those keys and see what is visually happening with the cursor as I do so. You can normally save quite a bit of time and effort this way.
5. Use Hand Tool instead of Scroll Bars
Back to Top
When you want to move around in your image, many people will use the scroll bars on the side and bottom. This is painfully slow and not too accurate.
Instead, you’ll use another modifier key – the [Space] bar. Holding down the [Space] will switch you over to the Hand tool from your current tool. As long as you’re holding the Space bar down, you can click and drag on your image to move it around to the exact part that you want to see or edit.
Letting go of the Space bar will then return you to the tool you were using.
The exception to this is if you are using the Type tool and the cursor is blinking. In this case, as you might expect, holding down the Space bar will result in spaces getting added to your text.
6. Layers Palette
Back to Top
This is a very powerful palette to keep open. Layers are essentially a way for you to non-destructively edit your file. I’ll break this lesson down into sections to do justice to the awesome power of layers.
A. Basic Layers
Back to Top
If I want to keep certain elements of my file isolated from each other then I can put it on its own layer.
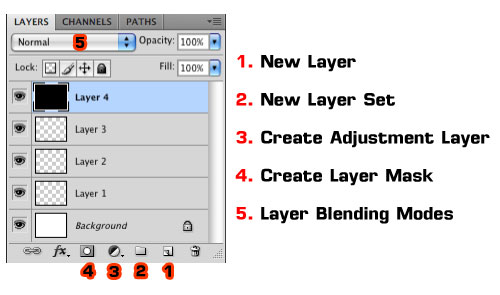
Clicking the “eye” icon next to the layer name will hide it or unhide it. Layers are also a quick way to grab a selection from whatever is on that layer. [Command-click] ([Control-click] PC) on a layer icon will select all the pixels of that layer, whether they’re connected or not.
Additionally, the Layers palette is where I can add Layer Effects, such as drop shadows or glows. Also using the Layers palette, I can adjust the opacity of a single layer, or put many layers into a group and then adjust all of their opacity at once.
It’s all a lot to digest, but the point of this is to make you aware of the functionality that you might not otherwise know of. You need to play around with them to truly understand what they do.
B. Blending Modes
Back to Top
If you check the top of the Layers Palette you can see there’s a pulldown menu there that most likely says “Normal”.
This means you layer is in the “Normal” blending mode and isn’t interacting with the pixels from any other layer.
If you change the mode, pixels in your selected layer will interact with the layer directly beneath it. How they affect each other depends on the mode you choose.
Taking a quick run through of the options, you might notice that the layers appear to correspond to photographic film techniques, like dodging and burning. While there are explanations of exactly what each option does, truly the best way to learn these modes is to just cycle through and try them out.
You can see they’re broken up into groups, some lighten, some darken, and some do both at the same time. The same mode might not always be the best option for each image, so you’ll need to experiment.
A quick way to test them out it to select your layer, then press Command-J (Control-J PC). This will duplicate your layer on top of the original layer. Once it’s copied you can run through the blending modes and just have fun seeing how they change the image.
C. Layer masks
Back to Top
You can add Layer Masks using the the “Layer>Layer Mask” menu at the top in Photoshop. Except it would be a waste of your time to do it this way.
All you have to do is select your layer, then click the “Add Layer Mask” button at the bottom of the palette.
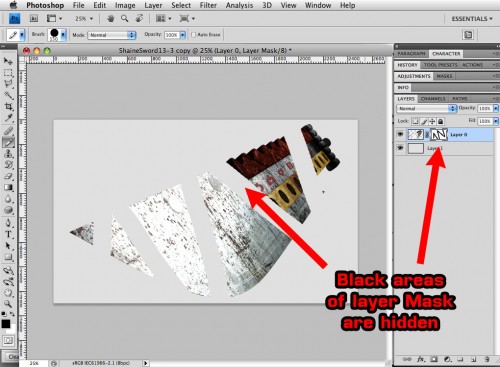
You’ll see a solid white icon appear next to the original layer icon. When it’s white, that means the entire layer is showing (ie nothing has changed).
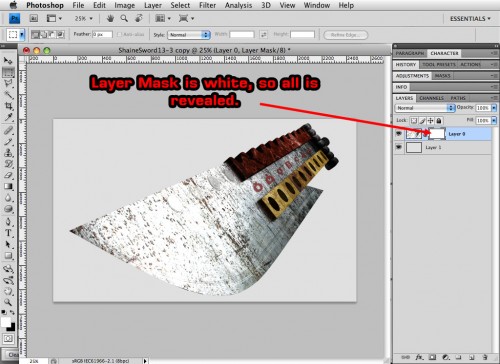
If I take a brush and paint with black on the layer mask (make sure the mask icon is selected, NOT the layer icon itself), then whatever is on that layer will appear to be deleted. Varying degrees of gray (or brush opacity) will cause the layer to appear transparent. A common “fade-out” technique is to use a layer mask and then fill it with a black and white gradient.
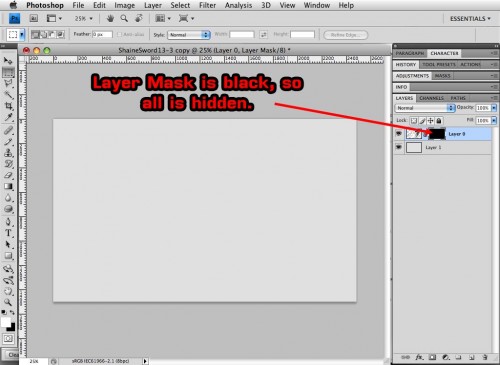
Many times I’ll Option-click (Alt-click PC) the “Add Layer Mask” button. This will add the layer mask, but immediately fill it with black, hiding the entire layer. Then I can “brush in” the parts that I want using a white-filled brush.
D. Adjustment Layers
Back to Top
Adjustment layers are probably the best reason to keep the layers palette handy. With these, I combine a Layer Mask and and Adjustment Layer to adjust color on only a specific part of an image, then I can turn it on or off as needed, all without destroying any pixels in the original image.
The Adjustment Layers icon is located to the right of the Layer Mask icon. You can choose adjustments like “Levels”, “Hue/Saturation”, “Curves” or “Solid Color” from the menu.
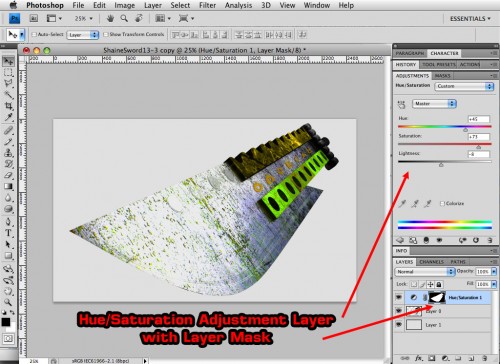
Doing it this way allows you to always go back by turning off or deleting that adjustment layer. If you were to choose “Image>Adjustments>” and pick any adjustment from the top menu, whatever change you made would be made to the entire file. Once you saved and closed it you couldn’t undo it.
Beware: If you’re working in RGB but your file (maybe or definitely) has to convert to CMYK at some point, sometimes the adjustments layers don’t survive the conversion, and you may be hard pressed to replicate your color adjustments.
For situations like this you can either start out in CMYK, or you’ll just have to keep a close eye on the gamut warning (View>Gamut Warning) to make sure you’re not selecting colors outside of the CMYK gamut.
If you get stuck you can try combining the layers in stages, keeping an eye on the color shifts to try to preserve the color when you convert. Sometimes this helps but you can’t always rely on it.
E. Layer Groups
Back to Top
The only problem with layers is that when you get more than a few they get unwieldy pretty quick. To keep a handle on them I always use Layer Groups.
These are essentially just folders in the Layers palette that you can collect similar layers into. Then you can close the folders when you’re not directly working on those layers to tidy up the palette.
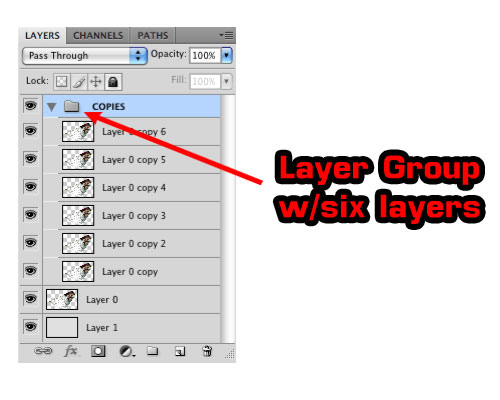
You can create a Layer Group by clicking the folder icon at the bottom of the Layers Palette, or you can choose “New Group…” from the flyout menu on the top right of the palette.
You’ll get a box where you can name the group, then you can drag your desired layers into the folder to add them to the group.
To save time, I like to select a bunch of layers, then choose “New Group from Layers…” from the palette flyout menu. This will automatically collect all the selected layers into the new group.
Once you have your layers grouped, you can select the folder and apply opacity changes and blending modes to all the layers at once, plus you can move all the layers in the group together without having to link them together.
7. Actions
Back to Top
If you find yourself doing the same routine of mouseclicks over and over again, you may be able to spare yourself some work by creating an action. These are controlled by the Actions palette (Windows>Actions).
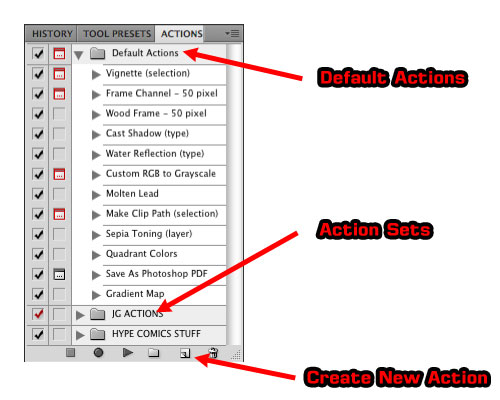
Essentially what you do is record your own menu selections and actions in Photoshop. So if I know that every time I make a selection, I’m going to modify the selection by expanding it 10 pixels, I can click the record button on my action, then modify a selection by expanding it, then stop the recording.
When I want to repeat this, I just click the play button on the Actions palette, and the action will be repeated on whatever is selected currently.
You can also add keyboard shortcuts to actions, so a multi-step procedure could become as simple as pressing one key.
Beware: Keyboard shortcuts assigned here will override any you created in the actual Keyboard Shortcuts screen.
Or, you can create an action and then run it from the Automate>Batch command under the File menu. This will allow you to run the same action on multiple files.
I applied an action to the “New Layer…” command to save time. But why not just use a keyboard shortcut?
Well, keyboard shortcuts don’t give me the option to override the resulting pop-up dialogue box that appears when you click the “new Layer” button.
That’s a great thing about actions, you can turn off the dialogue boxes that might otherwise cause your action to hang, waiting on your user input.
The control for that is next to the action name on the left. The square next to the checkmark is how you turn off dialogue boxes. If it’s empty, you’re good. If it’s filled in with something, then a dialogue will appear when the action is run.
You can save these actions in sets, and there are also a lot of preset actions that come along with Photoshop. You can load those up by going to the flyout menu on the top right and scroll down toward the bottom. You’ll see some such as “Video Actions”, “Frames” and “Image Effects”.
They’re probably not exactly what you’re looking for, but they might be a good start or step in the right direction depending on the project.
You can also export your actions (select the action set, then choose “Save Actions” from the flyout menu) and carry them to your next install of Photoshop when you upgrade. If you spend any amount of time making actions, you’ll benefit from doing this. Once you have a crash and you lose all that stuff, that’s when you’ll realize how much you relied on it.
8. Tool Presets
Back to Top
Following on the heels of Actions, Tool Presets (Window>Tool Presets) can save you even more time.
As you might have guessed, a tool preset will let you save the exact state of your selected tool so you can always recall it later.
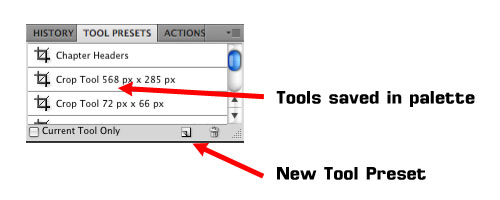
Here’s an example: If you crank out a lot of images and you need to add your signature, or if you need to add your blog or site logo to the file, it can waste a lot of time constantly putting that info in over and over.
Even if you have it already made up in a file you still have to go find it and copy it over or drag the layer over.
Tool Presets let you skip all that.
Let’s say I have my signature already on a layer in the file. To turn this into a Preset we’ll take these steps.
1. Select the image
Back to Top
You can usually marquee over it using the Rectangular Marquee Tool [M], being mindful of the background. If it’s on white and that’s ok, then you’re good, but if it’s something you’re going to want place over other imagery you’ll need to cut it out from the background.
2. Define Brush Preset…
Back to Top
While it’s selected, choose Edit>Define Brush Preset. You’ll get a pop up dialogue where you can name the new brush. Make sure it’s something descriptive so you can easily find it later (assuming your brushes are in list view).
In this box be sure to check the number underneath the thumbnail to the left. That number is the width of your brush in pixels. If that number is fine with you, then go ahead and click OK.
I usually go fairly large with it, about 1000px. I might work with files up around 5000px wide sometimes, so I like to have it come in large and reduce from there.
Consider the resolution of the file you’re creating the brush in, as well. A brush made in a 72dpi file may seem large enough, but when you apply it in a 300dpi file it will come out smaller than you probably want.
3. Choose Brush with Pencil or Brush tool
Back to Top
Now that your brush is created, you’ll need to choose your Pencil or Brush tool from the Tool Palette (pressing the [B] key will cycle through these tools), and then from the Control Palette at the top click the drop down menu next to the Brush heading and select your new brush (it should appear at the very bottom of all the brushes).
Depending on your Cursor Preference settings, your cursor may turn into the shape you created your brush out of. If it doesn’t do this, and you would like it to, go to Photoshop>Preferences>Cursors… and check the button for “Full Size Brush Tip”.
4. Click “New Tool Preset”
Back to Top
Once chosen you need to go to the Tool Presets palette (Window>Tool Presets if it’s not visible already) and then click the “New Tool Preset” icon at the bottom right (just to the left of the trash icon).
Alternatively, you can choose “New Tool Preset…” from the flyout menu on the top right of the palette.
You’ll get another box similar to the New Brush box. You can name it here (make sure it’s descriptive).
If you leave the “include color” box checked, the current color will always be applied when you use this preset. If you uncheck it, then whichever color you have in the foreground at the time will be applied to the brush.
So now that you’ve made your preset you can always select it from the Tool Presets palette with one click and just “stamp” it in wherever it needs to go.
9. History Palette
Back to Top
Sometimes people don’t realize that Photoshop can have more than one undo. Well, technically there’s only one ‘Undo’, but you can always go back in the History Palette (Window>History) if you need more.
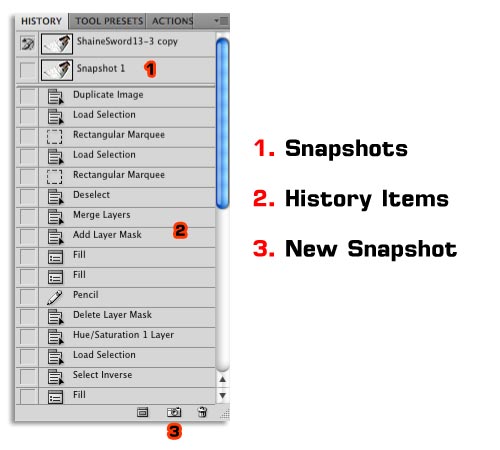
While Command/Control-Z will give you one undo, Command-Option-Z (Control-Alt-Z PC) will keep moving you backward in history.
The History Palette is a list of actions that you have taken since the file was opened (you start over when you close the file). If you click ABOVE an action, then it never happened, but it’s still there greyed out in the list to be reapplied if you click down to the bottom of the list. However, if you go on from there and do something different you lose the greyed-out action(s) entirely.
This palette starts off with a default state of 20. You can up the limit if you’re afraid of losing your work.
The very top of the palette has a “snapshot” of the file as it was when you first opened it. You can click that and go back to the way it was, bypassing all the history states.
This snapshot doesn’t update until you close and reopen the file, so if you want to make periodic snapshots you can do that by pressing the “Create new snapshot” button at the bottom.
Beware: The History Palette stores the history states on your computer, so it may become a trade-off for performance if you raise it too high.
10. Wacom Pen/Tablet peripheral
Back to Top
If you’re going to be doing a lot of Photoshopping, then this sort of a tool is indispensable.
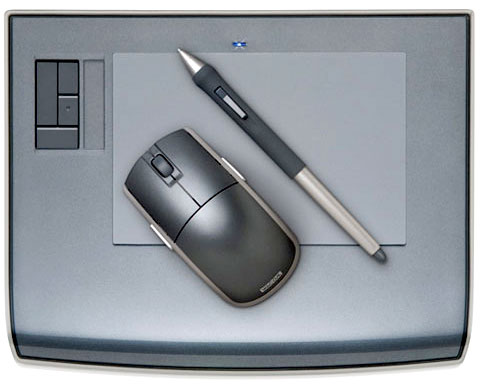
Not only is it more natural when you’re doing your brush-work and selecting, but with all the button options on the pen and on the tablet itself you can assign different modifier or other keys. If you have a shortcut assigned to an action you can assign that to the pen button and run your actions with just one click!
I have to say that using the tablet at home and at work has significantly slowed the progression of the dreaded carpal tunnel syndrome I’ve afflicted myself with.
I use the Wacom Intuos 3 (an old version) for everything (except for my Blender work). Now it’s tough for me to use a mouse.
The price is admittedly steep. If I was just getting in the game now though I would pony up for the Wacom Intuos4 Small Pen Tablet [Aff. Link -make sure to read through the reviews at the link to get a better idea of if it’s right for you]. Luckily for me my Intuos 3 is holding up great, so I wouldn’t change it out now.
For those of you interested, I’d honestly try ebay or Craigslist first before I paid full price, unless you’re one of those “warranty-minded” people. If you’re completely against a tablet solution or just not doing enough Photoshop to warrant it I’d say to at least get a programmable mouse that you can assign keystrokes to.
Unfortunately, as I don’t use a mouse anymore I don’t know a good one to recommend. Maybe those of you who do can link to some in the comments section for the curious.
School is OUT
Back to Top
Well, I guess I hear the bell ringing. You guys just completed the very first course in Hypertransitory Academy history.
I’m not handing out diplomas yet, though. There’s a lot more to come but right now I gotta get over to Hogwarts and help those guys out with some of my Photoshop wizardry.
Noobs, man. The whole lot of ’em.
Fell free to ask any questions in the comments or contact me. If you have any tips you can add those in the comments, too. I hope these tips help out!

Hey John, what a great tutorial. I went through all this and I can see so many great tips. I love Photoshop but I use only the very basics of it so this will come in so handy.
I haven’t seen the video yet, I will have to sit down, grab a pen and a piece of paper, open Photoshop and do it slowly.
But thanks so much for compiling this. How long did it take you to write this post, I spend so much time on long posts, although I love doing them?
Hey Brankica, it probably took me about 4 hours to write this up, and I even had all my notes and such before hand.
Plus the video took me about 2 hours to finally complete, and even more time to edit.
You can really only put in that kind of time when you really enjoy a subject. If this wasn’t a labor of love I woulda never hung in there :)
Whoaaaaa this is some great stuff! I’m a total n00b with Photoshop and it took me FOREVER to understand the concept of layers, lol.
I never even really took the time to watch any tutorials for it or anything either. I just kind of played around with things until they worked, hahah.
And like Brankica, I also really only use the basics, but this is worth bookmarking for sure, and I want to watch the full video too. I’ve always wanted to learn how to properly use Photoshop, so this is a definite asset for me.
Thanks a lot John! Gonna go tweet and Facebook the link!
Hey Elise! Sometimes the best way to learn is to just get your hands dirty with it.
At least you don’t have to learn the way I did -under the gun at a stress inducing job.
Thanks for the tweets and likes, I shore ‘preciate it!
Just let me know if you have any Photoshop questions. Peace!
JG – Great Work here! Man, you know your stuff don’t you! I’ve been messing around with PS for about 5 years, always at a very rookie level. With that said, I really enjoyed this post. Bookmarked it in my save file. Thank you for the value bro. PEACE
JK it’s my pleasure to help out. Photoshop is a tough beast to tame simply because of the vast amount of options and multiple methods to accomplish the exact same task.
If you ever have any questions just let me know, man. Thanks for commenting!
Hi John
i can’t believe the amount of time you must have put into this super-detailed and easy to follow lesson 1. It’s truly like atttending an Academy. I have been teetering on the brink to buy PS. Knowing there’s such help available might push me over the edge. Let me know if you have an affiliate with PS and I’ll be sure to buy via you.
By the way I tried to vote via your Blogengage button but its an invite only site. If you invite me I’ll join and vote your blog. Julia
Hey Julia, thanks for reading!
You know I never considered an affiliate deal with Adobe. i just checked out their site and I don’t see any kind of affiliate partnership. Curses! Oh, well… :(
And I’m not sure what’s up with the BlogEngage button. I clicked on it and it worked, even though I wasn’t logged in. I guess I shouldn’t be clicking my own vote button, though lol
I’ll look more into it, I’m trying to get the sharebar working on my site so hopefully that will get it working.
I can’t wait for another Lesson, those 10 tips are great, i’m going to buy some Wacoom tablet and explore Photoshop a little more :dd
Hi Jane,
I’m glad you got something out of this. You won’t regret picking up that tablet, trust me.
Just let me know if you have any questions and thanks for commenting!
Really great tutorial!
Thanks alot mate, Ive just started to learn Photoshop and this was what I needed indeed. Now I will have to alt+tab between Photoshop and explorer. Keep doing what you doing, Thanks!
/N
My pleasure, Nisse! This is what it’s all about so I’m glad you got something out of it!
Hey JG, this one if great. I am a big fan of Adobe Photoshop. I usually use it to make fun of my friend by cropping someone’s head and then attach it to my friend’s body. LOL. I will explore Photoshop more deeply maybe to make money in the future. :)
Andrew i think that’s how we all started out lol.
Oh man, all the pranks I pulled with Photoshop…ahh memories…
Let me know if you ever have any questions!
Nice talent in Photoshop editing. I actually interested to learn this field and I’m inspired with your work. Keep doing your passion and inspiring people. Cheers!