It’s time for a new comic, featuring a Steampunk duo of heroes facing a terrible threat to the city of London. Oh, and this time the comic is in VIDEO form!
The Secret Origin of Steampunkgoggles – The Comic
If you watched the comic video above, I hope you enjoyed it. It’s not really animated, and I guess I hesitate to even call it a “motion comic”, but I think it turned out well, and I learned a lot doing it.
Those of you who were around for my last Steampunk post know that I’m in a partnership with the fine folks of Steampunkgoggles.com, and this is a sponsored post.
Well, one of the items they really wanted to hit to help promote the brand was a video. The idea was floated that we would show off a pair of goggles from the site in our Halloween costumes. Well, even though I did pick up an awesome pair of Steampunk Mechanic’s Dream Welding Goggles with Flip-up Lenses, I really don’t like to be on camera, myself.
Then I thought, I’ll make something that can not only help now, but might help even years from now. Thus, the Steampunkgoggles Comic Video was born!
The Making of Steampunkgoggles – The Comic
Part 1 – Daz Studio
Well, the idea of the Comic Video was born. I still had a lot of work to do to make it a reality.
If you’ve been around this site, you guys already know I create a lot of my 3D work using a program called Daz Studio. I already had the models of the two main characters, so that was a lot of work already done.
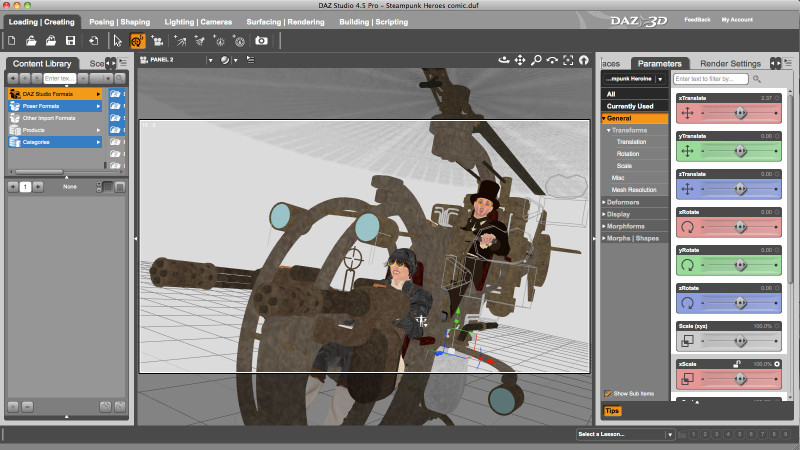
Below is one of the panels from the video, as it appears in the Daz Studio working environment:
I had to pose and set up each panel as a separate scene, so I ended up repeating the process and eventually ended up with about 40 finished renders.
Part 2 – Photoshop
The renders out of Daz come out very flat, which is how I intend them to be. I add a lot of the shading and visual “punch” to the artwork in Photoshop. Here’s the scene from Daz as it appears once finished in Photoshop:
Part 3 – Illustrator
I always add the text for my comics in Adobe Illustrator. This time was no different, even though the final form of the comic would be a video, instead of a jpeg file.
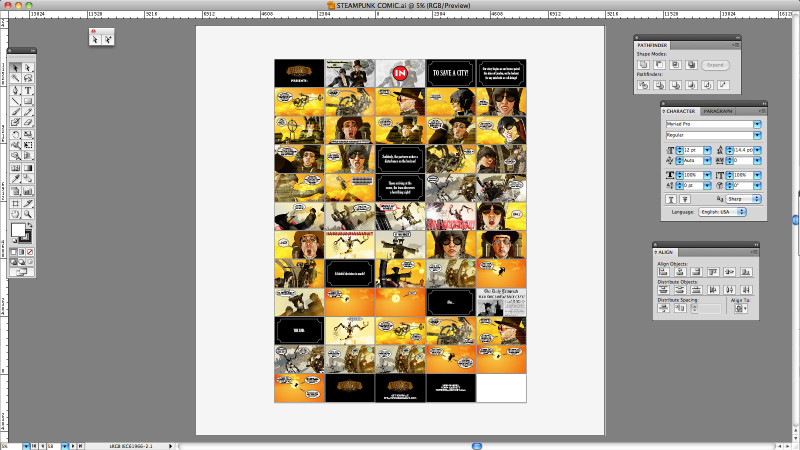
To make things easier, I used the Multiple Artboard feature of Illustrator. This way I can lay out all the panels in one file as if it’s a storyboard. The best part is I can then save out all the panels as separate files. I can save as tiffs, png’s, jpgs or even a multipage pdf if need be.
This spares me from having a zillion different Illustrator files. However, it also means you’ll balloon the file size of your document. If your computer is slow, it might not be able to handle having that many image files in one document. Luckily in this case, the final output is for the screen, so I was able to use 72dpi jpeg files. If it would have been for print, I don’t think my computer would handle 50-60 hi-res tiff files in one Illustrator doc.
Here’s a screen shot of what the Illustrator setup looked like:
You can see that some of the frames are out of order, but it didn’t matter too much at this point. After I exported from Illustrator, I re-organized all the jpegs in Adobe Bridge, then batch renamed them to the correct order, so it was all good.
Part 4 – iMovie
This is the part I have the least experience with, as I don’t do video files too often.
Right off the bat, the annoying thing was I had to add my images to iPhoto before iMovie would see them. Maybe there’s a better way, but I was running short on time so I just went with that.
After I finally got them in there, it became a matter of adding in transitions, adjusting the timing on specific frames, and adding in the visual effects.
I wasn’t able to do many of the things I would have liked, but I can’t really complain since iMovie came free with my computer. If I need better effects I’ll have to pony up.
Adding the audio was a bit tricky. Without having access to a lot of “safe” public domain music, I was forced to use the Garageband loops installed on my machine.
Guys, I must have listened to a solid hour of those damn loops before I found ones I could use. There was one loop I wish I could have used but it was so short, and looping it just wasn’t lining up correctly with the images I had. Again, I was running short on time so I couldn’t go back and make another frame at that point. Oh well, lesson learned on that one.
Here’s a screenshot of my iMovie working environment:.
Get in on the action!
If you’re looking for a pair of your very own Steampunk Goggles, you can use the coupon code TRIBERR1 for $5 off plus free shipping on all orders over $30 over on steampunkgoggles.com!
Or if you’re an enterprising type, you can get them for FREE!
Steampunk Goggles Pin to Win Contest

All you Pinterest Pioneers need to get in on this one for chance to win a FREE pair of goggles! Here’s the basics:
- If you do not already have a Pinterest account and board, then set one up here: http://www.pinterest.com
- Pin the banner you see on the left to your board
- Pin at least three product images from our product catalog on SteampunkGoggles.com to your board, along with a creative description that includes the hashtags #SteampunkGoggles and #PinToWin
- Pin other steampunk imagery to your board – you will be judged on the creativity and composition of your board, including image selections, descriptions, hashtags and other factors.
All the rest of the rules and such can be read here: http://www.steampunkgoggles.com/pintowin/
Good luck, guys – and if you snag a pair, shoot me a pic!
Steampunkgoggles – The Comic, The Critique, The Wrap Up
While I do see some areas I would improve upon if I ever make another one of these things, I’m very happy with what I was able to accomplish within a week’s time.
In the future I’d try to find some more suitable music, and also some sound effects to throw in there. Although iMovie may not be the tool to use if it starts getting too complicated.
Daz Studio does have animation tools which I’ve used before, but it’s been so long I’d have to re-familiarize myself with them before I could say if that was the right way to go.
All in all, I got a kick out of doing it, and hopefully this is something that can help the Steampunk Goggles brand in the future.
Let me know what you thought of the video in the comments, I’d love to hear it. Also, I’d definitely appreciate it if you would share this thing around for me. Aside from that, I’m outta here and I’ll see you guys next time!


Very cool! Thanks for the inside look.
Thanks for checking it out Maurice, I’m glad you liked it!